Sunday 16 October 2016

Copper Chimneys

Hello.

For a couple of upcoming projects of mine I needed a source of some GWR type chimneys. The original plan of mine was to use some bits from the excellent range of castings that Nick Tilson of N Brass produces. The thing is his castings are in Brass and I wanted to do the distinctive copper capped chimneys that so many GW engines had so this is my solution...

First I found some great little blog posts that Paul has done HERE which show in fantastic detail how he produces them. This seemed the ideal way to try making my own but, once again, they were Brass. My idea was then to do some research to find out what the best grade of Copper was to machine as there is a good range of alloys available, some of which are a pain to machine. The final decision went to some C109 Copper and was duly ordered via Ebay  HERE

Once the Copper had arrived and I have time I firstly scales a works drawing for a chimney which provided me with the dimensions I needed so then I promptly made a start. My plan was to make the whole chimney out of Copper so once it is painted the top could then be polished up, looking all GW.
Machining the Copper was a dream, it cut really well and left a good finish. For your information the plaster covering a cut isn't due to me being clumsy on the lathe, its from an earlier DIY job!
Above shows what they look like after being turned on the lathe. It took a couple of attempts to get some which I was happy with, the chimney on the far left of the picture is one of those failures. I decided to keep it so I had something to experiment with on the next step. The steel bush was also required for the next bit.

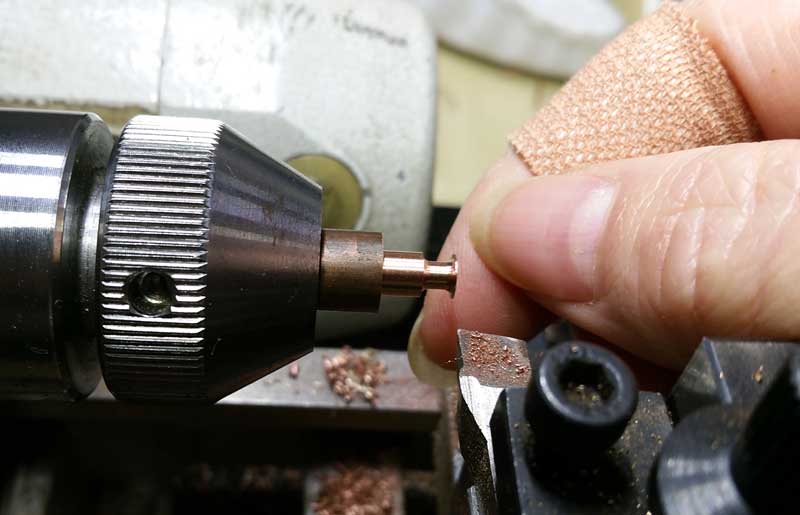
As per Paul's posts the next step was to hold the chimney in position and then form the base around a suitable bar similar to the boiler diameter. I used (ironically) the copper bar which was used to make the chimneys from and my manual milling machine.

So above are the finished chimneys. Thanks to Paul the whole thing went well and definitely weren't as daunting to make as I first thought. I now have much more confidence making bits for boilers.

Julia.


Tuesday 4 October 2016

Cheap Chinese Trees

Hello again.

A sort while ago I was browsing Ebay (as you do!) and stumbled upon a couple of listings which caught my attention.
http://www.ebay.co.uk/itm/351506263843?_trksid=p2057872.m2749.l2649&ssPageName=STRK%3AMEBIDX%3AIT
 http://www.ebay.co.uk/itm/291560823046?_trksid=p2057872.m2749.l2649&ssPageName=STRK%3AMEBIDX%3AIT
Now one of the things which has been annoying my about the layout is the lack of trees so I hatched a plan to 'bulk out' the layout in a few places with some more generic trees. The thought was that maybe these cheap trees could provide a good armature to use some more 'realistic' methods upon.
Once the trees arrived the first thing I did was to remove the existing foliage, fortunately it was possible to pull the foliage off the armatures by hand, it seemed to be glued in place using a hot melt glue gun or similar.

 This left me with a plain plastic armature which I could then start on. The next step was to add some more realistic bark and being a fan of the Bark powder by Treemendus (http://www.treemendus-scenics.co.uk/tree-kit-order/) I needed a way to glue this onto the armature.
The method I ended up using was to buy some cheap varnish in a big enough tin so I could dunk the whole armature into the tin. Once the majority of varnish had dripped back into the tin the next step was to  apply the bark powder. I did this by using a small sieve (a bit messy).
It was then onto the foliage. The tree needed bulking out so I decided to use some Woodland Scenics Polyfibre (http://woodlandscenics.woodlandscenics.com/show/category/GCPolyFiber) which was dotted all over the armature. I found it wasn't necessary to glue it in place as the texture on the armature held it in place.
This was then given a spray of some Peco scenic spray adhesive (http://www.osbornsmodels.com/psg-11-peco-scene--layering-spray-400ml-39767-p.asp) and covered in various ground scatters.
Once the glue had dried all the trees were then given a final trim and then added to the layout. The main bit of the layout I wanted to cover up with trees was the area to the left to cover the hole in the backscene.
So there you have it. Total cost for about 20 trees from China is about £5.00.

Please, let me know what you think...

Julia.