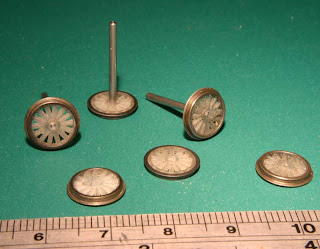
Today has been an interesting one. After a 'pep talk' from a fellow member of the 2mmSA Oxford Group with regards to my 3D printed wheel centers I then realised that I had enough bits to make a set of replacement wheels for a Graham Farish Pannier Tank. Below is what I managed to achieve in about 5 hours today...
Here are the ingredients for the conversion.
- A Graham Farish Pannier Tank Engine
- Some 1.5mm steel rod
- A couple of etched coupling rods from the 2mmSA (3-205)
- 6 x 3D printed spoked wheel centers.
- 6 x 9mm Steel wheel rims (courtesy of the 2mmSA)
- 6 x 2mmSA Crankpins (I used 3-106 but 3-107 would be better (I didnt have any!))
Step 2 was to cut 3 lengths of the steel rod for the wheel axles. I cut them with at least 10mm extra than I needed (for holding). I then used my rotary tool to clean up the ends and add a small chamfer to ease pressing on the wheels.
Step 3 was to press the axle onto the wheel. I used my drill press to make sure everything stayed square. I pushed the axle about 5mm through the wheel. I ended up with this...
Step 4 was to press the second wheels onto the axle. I did this by first holding the 5mm length of axle in the check and then pressing the second wheel on until it was on the axle. I then used a small length of tube which was a sliding fit over the axle and using a back-to-back gauge, pressed the wheels together until the gauge was a good fit between the wheels.
Im going to mention the gear now too. I 'salvaged' it from the original wheels as I didnt have an alternative but then found out that it had a bore of 1.6mm! Im not going into too much detail about how I got it to fit the axle (it was a bit of a cobble!) but it was pressed onto the axle of one wheelset before the second wheel was fitted in much the same way.
I then ended up with wheels like in the photo above. The pair nearest the ruler shows the next steps 5 where I cut the axle flush with the wheel (well cut it not quite flush then filed it down), then step 6 where I fitted the crankpins but pushing them through from the back with a bit of superglue to hold them in place.
Step 7 was them to paint them buy first giving the wheels a good clean in some IPA and then once dried I painted them with some Humbrol matt black.
Fitted into the chassis they look like this...
And below is how far I have got today. I still have a bit of work to do soldering the coupling rods in place but you get a good idea of the finished thing...
Julia :)


Julia,
ReplyDeleteHi,
I like your wheels who did them for you? Im still in the design stage of my pre quartered wheels and these may be an easier/better option.
regards
Damien
TwommLocomotives
Hello Damien.
ReplyDeleteI designed and drew the wheels then uploaded the designs to a company called Shapeways who printed them for me. The design needs a few tweaks but as far as a proof of concept goes they are fine so far...
Hi Julia,
Deleteim just in the final stages of sending some bits to Shapeways. I have done wheels, boilers, chimneys etc and want to make sure they come out good quality. Did you have yours done with Fine Detail Plastic?
I will be interested to see how long your wheels will last. FUD is a lot more brittle than ABS or nylon that wheel centres and we know that early Gibson wheels cracked a round the hub because of brittle plastic.
ReplyDeletePersonally I wouldn't trust FUD with any sort of force fit.
Bill Bedford
I will be interested too Bill.
ReplyDeleteAny plastic which has a low melting point cannot inherently be that stable. The restrictions I have currently is the printing process, in 2mm there just isnt the availability of machines at the right price to get anything better. I am sure that in time things will get better, cheaper, more accurate buy until then this is the best I can manage.
There is a distinct advantage with 2mm scale though in that the wheels are so much smaller than 4mm so therefore must be much stronger.
As you say, only time will tell. I know its not the ideal material but using the methods above I didnt encounter any real issues with FUD.
Thank you for the advice though, I know you have been working on things like this for a while now.
Julia :)